How to get the best out of automatic calf feeders
Automatic calf feeders can be powerful tools for feeding large groups of calves efficiently. They help reduce manual labour, improve feeding consistency, and allow for gradual weaning. However, to fully benefit from an automatic calf feeder, careful setup, calibration, and monitoring are essential.
Calf rearers often assume that an automatic calf feeder will always mix correctly, but that is not always the case. It is also wrong to assume that every calf has had sufficient intakes, is satisfied, content and healthy. The default feed curve may need adjusting to suit your farm. The following guide outlines the key considerations for to maximising the benefits these machines offer and avoiding issues with animal health and performance
Key considerations
- Understand the machine – Take time to learn how the feeder operates.
- Training is essential – Staff must be properly trained on how to operate the feeder.
- Set up the right feed curve – Calves may be a couple of weeks old before introduction to the feeder. Adjust feed plans accordingly to avoid delaying weaning.
- Use multiple feed curves if needed – For example, have one for replacement heifers that will remain on the farm and another for beef calves that will be sold.
- Take advantage of gradual weaning – Automatic feeders allow slow weaning, which encourages dry feed intake and supports rumen development.
- Watch portion sizes – “Little and often” is not always best. Aim for 2 – 3.5 litres per feed to ensure calves are satisfied, not left waiting for milk when they could be resting or exploring dry feed.
Calibration and milk solids
Accurate calibration is critical:
- Automatic feeders can give misleading data on milk powder per litre.
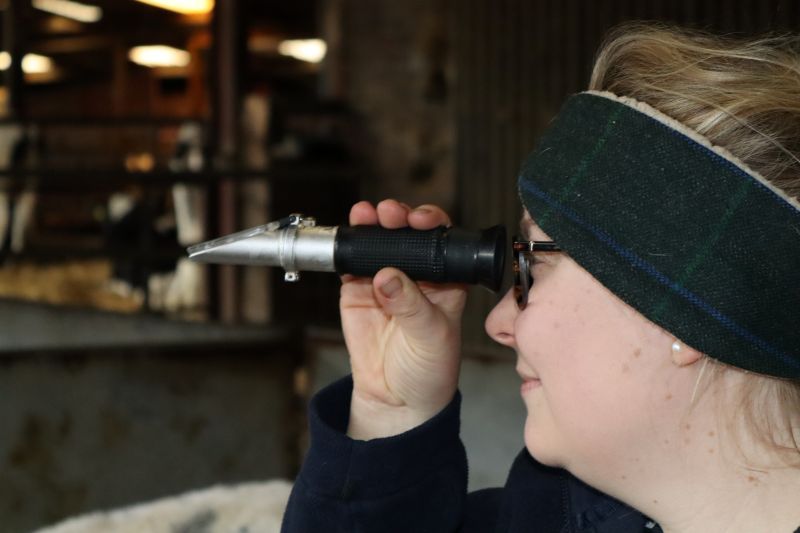
- Use a refractometer to check milk solids. If the feeder is set at 125 g/litre, the refractometer should read 12.5% brix. If not, the machine will need to be calibrated.
- Remember, some machines add a litre of water to powder, while others make the powder up to a litre. Know which system you are using.
- Always ensure a header tank is in place to guarantee consistent water supply.
As is true for manually-fed calves, incorrect mixing stresses calves and often results in digestive issues, such as bloat.
Choosing the right milk replacer
Select a milk powder that:
- Flows correctly in the machine
- Provides calves with the best source of good-quality milk-derived ingredients
- Provides an excellent health package
The importance of excellent stockmanship
Even with automation, excellent calf care is non-negotiable:
- A good stockperson will physically check the calves at least twice daily.
- Review feeder data regularly – it can highlight calves that are slow to drink or not drinking at all, often early signs of illness.
Hygiene and disease prevention
Before moving from manual to automatic feeding, it is essential that calf health is good. Excellent management of colostrum and transition milk is important as it sets the foundations for good health and performance. The aspiration should be to achieve a high passive immune status in all calves. This gives them the best chance to fight disease in the early weeks when they are undergoing several changes.
Hygiene tips:
- Wash and change teats daily
- Keep feeding and bedding areas clean, dry, and well drained
- Provide clean, fresh water
- Ensure staff follow hygiene protocols before entering pens
Sick calves are less likely to push for access to the feeder. Disease transmission is a major consideration if several calves are sharing one teat as this increases the risk of contamination between calves.
Managing group size
Large groups are common with automatic feeders but can increase disease risk. More calves in one area means more calves suckling the same teat. This increase in direct contact has a huge impact on disease transmission. Higher stocking densities often mean bedding can be wet and have higher levels of faecal contamination and result in less space per calf.
- Smaller groups reduce the risk of respiratory illness and improve growth rates (Svennson, 2006).
- Keep age gaps within two weeks to avoid bullying and disease spread from older to younger calves.
- Ensure pens suit all calf sizes, with easy access to water and feed troughs.
Training pens and grouping systems
- Training pens can create hygiene challenges if not managed properly.
- An all-in, all-out grouping system is preferable: calves are grouped by age, weaned together, and pens can be fully cleaned and disinfected before new calves arrive.
- Block calving systems suit this approach best.
Training calves on automatic feeders
- Transition calves into group pens with a full stomach so they settle before training.
- Allow them to explore, then return when they are hungry and ready to learn.
- Avoid changing feed type on the same day as moving. Transition calves to the milk replacer they will receive on the machine a few days before moving.
Ideally, calves should be fed colostrum followed by transition milk or transition milk replacer for at least their first 10-14 days of life. This may determine when calves are moved onto the automatic calf feeder. Calves may be able to be introduced to the automatic feeder sooner if they are close in age and require the same feed, or if the machine has two different hoppers for feeding different types of milk.
Feeder station placement
- Install feed stations at the lowest point of the shed floor for drainage.
- Consider the ease of access for cleaning when choosing the feeder station placement.
- Keep wires and tubes out of calves’ reach.
- Use solid-sided stalls, wide enough for only one calf, to prevent bullying.
- Provide enough space in the lead-in to avoid pushing and queuing.
Key takeaways
- Check that the feeder is mixing correctly
- Don’t assume calves are drinking enough milk – observe and monitor them
- Adjust the feed curve to suit your farm
- Ensure calves are healthy, satisfied and content
- Maintain excellent hygiene and stockmanship